letsencrypt and NearlyFreeSpeech

I’ve been running this site on nearlyfreespeech for some time now.

Last week I created a cert using the tools and service made available by letsencrypt.org, and then configured my NFS server to use it. It was pretty easy, but not documented. I’ll share here what I did to make it work.

I am able to SSH into the nearlyfreespeech server. I can also perform a git clone from that server to get the letsencrypt tools. But when I ran the letsencrypt-auto tool from the server, it didn’t do what I wanted it to do. This was my first time with the tool, and I’m unfamiliar with the options, so maybe it was just pilot error.

In any case, I solved it by running the tool on my Mac OSX machine and transferring the generated PEM files to the server.

  1. I ran git clone on my local workstation (Mac OSX)
  2. from there, I ran the letsencrypt tool with these options:
    ./letsencrypt-auto certonly  --manual  \
       -d www.dinochiesa.net -d dinochiesa.net \
       --email dpchiesa@hotmail.com
    
  3. follow the instructions. I needed to create endpoints on my NFS server that responded with specific values.
  4. when that completed, I had the cert and keys in PEM format. I then copied them to /home/protected/ssl on the NFS server
  5. opened a service ticket on NFS as per This FAQ
  6. a couple hours later, the NFS people had completed the SSL config for me

Maybe this will help someone else.

It’s possible that I could have used the –manual option on the NFS Server, and avoided the need to transfer files. Not sure. If anyone else has done this, I’d like to know. I will need to renew my certs every couple months.

I’m really pleased about the letsencrypt service. I hope it gets used widely.

Update, 2017 December 7: I’ve updated my certs 3 or 4 times since I made this post. Now, this is what I do:

   sudo certbot certonly  \
     --authenticator manual  \
     --domain www.dinochiesa.net \
     --domain dinochiesa.net \
     --email dpchiesa@hotmail.com \
     --rsa-key-size 4096

I’ve automated the other parts – creating the right endpoints on the NFS server, and then copying the generated certs when they’re sent. Also NFS no longer requires a service ticket; it will automatically install certs when I update them. The change takes a minute or less. Super easy.

Use PHP code to make WordPress redirect to secure site

Lots of people use the .htaccess redirect rules to force their wordpress sites to load with the secure option.

It looks like this:

But if you have a hoster that does not provide you the ability to modify the .htaccess file, that won’t work. These hosters typically set up your server behind their load balancer which means the wordpress code sometimes cannot directly infer whether HTTPS is in use. In other words, the $_SERVER[‘HTTPS’] is not correct.

It is possible to introduce code into your theme that will do what you need. This is the PHP code:

Insert that in your theme header.php file. Or maybe the functions.php file. Invoke the maybe_redirect_to_ssl_site() function in the theme header before emitting any HTML.

Moving to nearlyfreespeech.net – bare domain and www

NFS

I moved to nearlyfreespeech.net this week, from 000webhost.com. It is much faster, and now I won’t get popup ads.

While moving the site, I took the opportunity to upgrade to the current WordPress. I think I was on WP3.3 previously; now it’s on the current release. And now I’m on the current PHP, too. Nice.

Everything went pretty well. I had some fun with the wordpress part – updating the existing plugins, using wp-cli, fiddling around with my own plugins which had a few problems using deprecated WordPress functions…, doing surgery on other plugins, now abandoned.

I had to update from the old Twitter widget I had been using; it was still using the Twitter v1 API, which did not use OAuth. This API is no longer supported, so the widget wasn’t able to retrieve any tweets. I found a new one called… really-simple-twitter-feed-widget. And it was pretty simple, in the end. But I did have a problem: when pasting my token secret into the configuration box, I inadvertently had grabbed a leading space. Instead of pasting “XYZABC” as the token, I had pasted “_XYZABC”. But I didn’t realize this, because the textbox was masked, and all I saw was those dots.

The incorrect token secret caused all of the signatures generated by the widget to be invalid; therefore the Twitter API was rejecting them. I had to crack into *that* code as well, to diagnose this. Only printing out the token secret just before it was used to generate the OAuth1.0a signature showed me the light. After that, the new Twitter widget just worked! Sweet!

Finally, I got all the PHP squared away.

NFS is a cheap hoster, but easy? No. I don’t mind the lack of cPanel. I love the SSH access to my machine. Everything is possible on NFS; the trick is figuring out HOW to do stuff.

The last thing I got stuck on, in the move to NFS, was configuring http://dinochiesa.net to redirect to www.dinochiesa.net. The FAQ for NFS says that you can do it using “a hard canonical name”. But doesn’t say HOW to make that effective. Back and forth through the FAQ on the NFS site, to no avail.

At last, this blog post helped me.

  1. Go to the Nearlyfreespeech UI ->Site->Select the site in question->Add a new alias e.g. dinochiesa.net
  2. Once dinochiesa.net appears under the Site Name and Aliases table in the site menu, click the “Set Canonical Name” (on the menu on the right)
  3. Select HARD Canonical settings and select www.dinochiesa.net

Thanks, Keith! I don’t know why this isn’t in the FAQ doc for NFS.

Properly styling embedded Github Gists

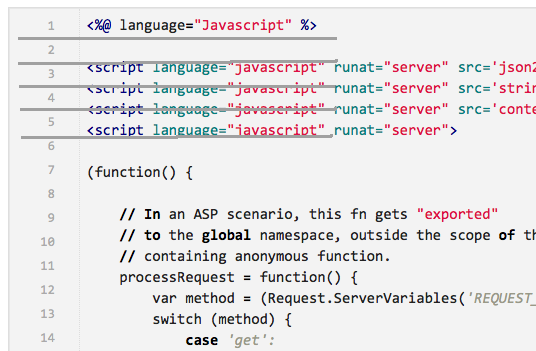
I use github gists, and sometimes I want to embed a gist into a blog post. Using the script block github provides gives me poor results. There are several problems:

  1. The main problem is the line numbers on the left-hand side don’t line up with the lines of source, on the right hand side. I’ve shown that in the image above with the grey lines I’ve drawn in after the fact. (No, the grey lines do not show up in the original.) My blog styling is interfering with the gist styling.
  2. There is no styling guide. I want the font to be smaller, and I want the width to be settable, and I want the div to scroll vertically, and it should be limited to a reasonable length. I will have to open up Firefox inspector to figure this out; it’d be nice if github provided some hints for me.

Good effort by github, but not usable for me out of the box. I resorted to using the github api directly, and embedding the retrieved content using jQuery. This is also not optimal because the styling and line numbering is missing. See my recent post on ASP Classic for a visual example. Also it takes longer for me to write the markup that does this.

With the help of this blog post, which I found from this stackoverflow question, I was able to style it properly without doing too much css archaeology. Reasonable result:

PHP and JSON and Unicode, Oh my!

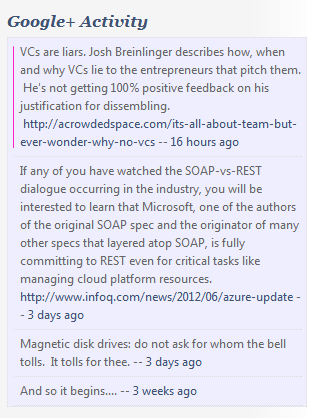
Today I had a bit of a puzzle.  The gplus widget that I wrote for WordPress was rendering Google+ activity with a ragged left edge.

Google+ Widget
The ragged edge is shown for *some* activities

As geeks know, html by default collapses whitespace, so in order for the ragged edge to appear there,  a “hard whitespace” must have crept in, somewhere along the line.   For example, HTML has entites like   that will do this.  A quick look in the Chrome developer tool confirmed this.

I figured this was a simple fix:

$content = str_replace(" "," ", $content);

Simple, right?

But that didn’t work.

Hmmm…. Next I added in some obvious variations on that theme:

$content = str_replace(" "," ", $content);
$content = str_replace("\n"," ", $content);
$content = str_replace("\r"," ", $content);

That also did not work.

This data was simple json, coming from Google+, via their REST API. (But not directly. I built caching into the gplus widget so that it doesn’t hit the Google server every time it renders itself. It reads data from the cache file if it’s fresh, and only connects to Google+ if necessary). A call to json_decode() turns that json into a PHP object, and badda-boom. Right?

Turns out, no. The json had a unicode sequence 0xC2A0, which I guess is a non-breaking space if you speak Unicode. Not sure how that got into the datastream, I certainly did not put it in there myself, explicitly. And when WordPress rendered the widget, that sequence somehow, somewhere got translated into  , but only after the gplus widget code was finished.

I needed to replace the unicode sequence with a regular whitespace. This did the trick.

$content = str_replace("\xc2\xa0"," ", $content);

PHP, JSON, HTTP, HTML – these are all minor miracle technologies. Sometimes when gluing them all together you don’t get the results you expect. In those cases I’m glad to have a set of tools at my disposal, so I can match impedances.

A Google+ Widget for WordPress

I looked for, but did not find, a reliable, easy to use, solid Google+ widget for WordPress. All I want to do is display on my WP blog a little sidebar listing of the 4 or 5 most recent activities from my G+ account.  Is that so hard?

Not sure why I couldn’t find it, but since I am interested, I looked into building a plugin. How hard could it be?  Turns out: not very.  You can see the results to the right.

Google is encouraging programmatic use of their social network.  They’ve published the network protocols – the HTTP request and response messages required to do various things. They also produced and released client-side libraries that implement these protocols – very nice. They’ve got one for PHP.   So, yeah, obviously, that seems like the right thing to use as a base for WordPress interaction with Google+ .

The “Hello World” of PHP-to-Google+ apps:

<?php 
$apiKey = "xxx-double-secret-xxxx";
$id = "101866550969463527083";

require_once 'src/apiClient.php';
require_once 'src/contrib/apiPlusService.php';

$client = new apiClient();
$client->setDeveloperKey($apiKey);
$plus = new apiPlusService($client);
$person = $plus->people->get($id);

echo "<h1>User info</h1><pre>\n";
print_r($person);
echo "</pre>\n<hr/>\n";

$collection = 'public';
$results = $plus->activities->listActivities($id, $collection);

echo "<h1>Activites</h1><pre>\n";
print_r($results);
echo "</pre>\n<hr/>\n";

echo "<h1>Comments</h1>\n<ul>\n";
foreach ($results['items'] as $item) {
    if ($item['verb'] == 'post' && is_array ($item['object'])) {
      print('<li>' . $item['object']['content'] . "</li>\n");
    }
}
echo "</ul>\n";

That worked pretty well, and took about 60 seconds of download and install. With that kind of momentum I went right into constructing my first wordpress plugin.   It’s a simple model – implement a class that extends WP_Widget .  Provide a widget() method that renders the thing. Inside the render function, include a subset of the code from the Hello, World app above. Ba da boom.

WordPress seems very nice to use, and very easy to extend.

This plugin is prety simplistic. It uses the API Key method, rather than OAuth2, for authentication to Google. It works just fine.  For a highly-loaded website, I’d need to insert some caching to eliminate unnecessary hits on the Google+ service. But for my nice and friendly blog, it’s just fine.

Here’s the code if anyone else wants to try it out.